
Lets learn how to draw a bitmap onto the screen at a specified location on the N64


N64_Bitmap.asm

Simple Sample Series
In this series we'll take a look at simple examples to do essential tasks! |
Lesson
S1 - Bitmap Drawing on the N64 Lets learn how to draw a bitmap onto the screen at a specified location on the N64 |
 |
 N64_Bitmap.asm |
 |
Drawing a bitmap
| We're going to draw our mascot onto the screen. | 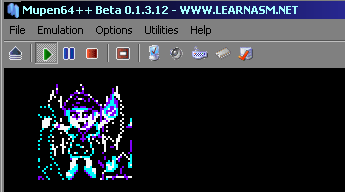 |
| Ok, Lets start our program. First we tell our assembler (ArMips) we're compiling for the N64, we are going to save to "\RelN64\cart.N64", and our cartridge needs to start at memory address 0x80000000 |
 |
| We need to define a header for our cartridge. This has things like our program name, country and other useful factoids. It also contains a CRC (calculated Checksum) which needs to be correct, but we'll fix that with 'rn64crc' later. |

|
| We need a 'bootstrap' to start up the n64. We have two options... 1.Code up 1000 lines of code - or 2. patch in a Binary file we 'borrowed' to do the job. We'll use option 2 - actually many commercial games use the exact same bootstrap! |
 |
| We want to pad our cartridge to 8Mb, so we add a 'footer' to do this |  |
| OK! We need to set up our screen! Our screen will be 320x240 - 16 bpp (32,768 colors) it will start from memory address 0xA0100000 The video registers start from address 0xA4400000 - the values shown here will set up the screen. |
 |
| Ok, Now for our little program! First we'll clear the screen... 'CLS' sets the screen to the color in A0. The color is 15 bit in the format %RRRRRGGGGGBBBBB- We use 'GetScreenPos' to calculate the VRAM destination for the position we want to draw the bitmap - it returns the VRAM address in A0 We show our character with 'DrawBitmap', this takes a width and height, and a source address for the bitmap Then we'll stop - ending with an infinite loop |
 |
| Here is the result |  |
Clearing the screen
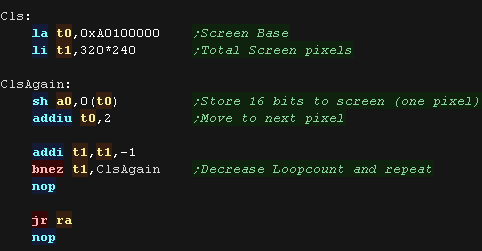
| Lets clear our screen Our VRAM starts at 0xA0100000 , and each pixel is one Half (two bytes)... the total screen size is 320*240 pixels Our colors are defined by 5 bits per channel in the format %RRRRRGGGGGBBBBB- We write our color to all the pixels. |
 |
 |
RAM
on the N64 is in BIG ENDIAN format! Meaning that the Half 0x1234
would be stored as 0x12 0x34 in memory. That doesn't affect CLS, but our bitmap needs to be in the correct format |
GetScreenPos
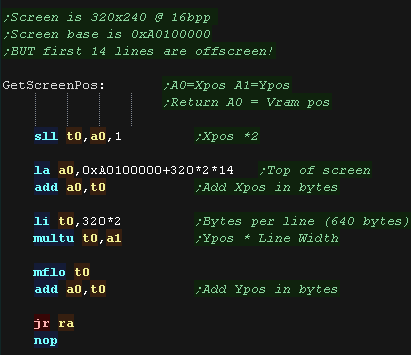
| We want to calculate a screen position! We pass an Xpos in A0 and Ypos in A1 and calculate the final destination in A0 As the first few lines are offscreen, the formula we use to calculate the vram destination is: Vram = 0xA0100000+320*2*14 + (320 * 2 * Ypos) + (Xpos * 2) |
 |
DrawBitmap
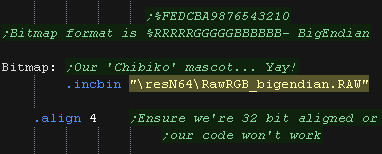
| We need to create a valid bitmap file to show to the screen. The pixels are in the format %RRRRRGGGGGBBBBBB- On the N64 The data is in BigEndian format. |
 |
| We transfer each line of our source bitmap to the screen. We do the bitmap line by line, moving our VRAM destination down one 320 pixel line after each line |
 |
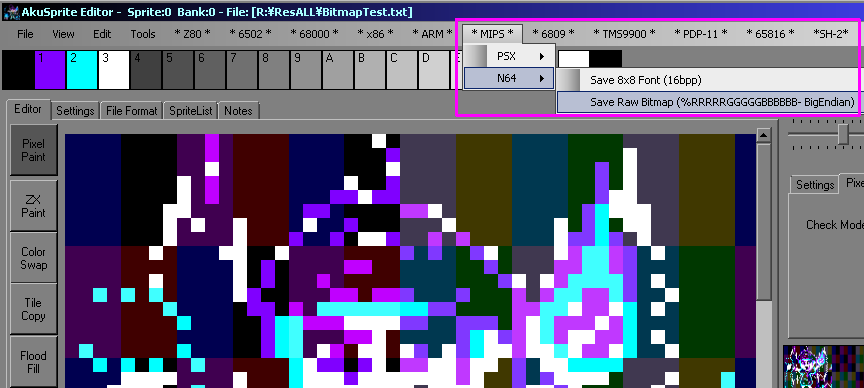
| Need to convert your bitmap? No problem! My Akusprite Editor can convert bitmap files to the correct format. Take a look at the MIPS menu -> N64 -> Save Raw Bitmap It will output a binary file in the correct big endian format for this example |
 |
 |
We could make
our drawbitmap more efficient if we worked in words (pair of
pixels) instead of halves (Pixels), but for clarity we're working
in single pixels here. |
 |
Lesson
S2 - Sprite Movement and Joystick on the N64 Lets draw a sprite to the screen, and move it with the joypad |
 |
 N64_Joystick.asm |
 |
Drawing a bitmap
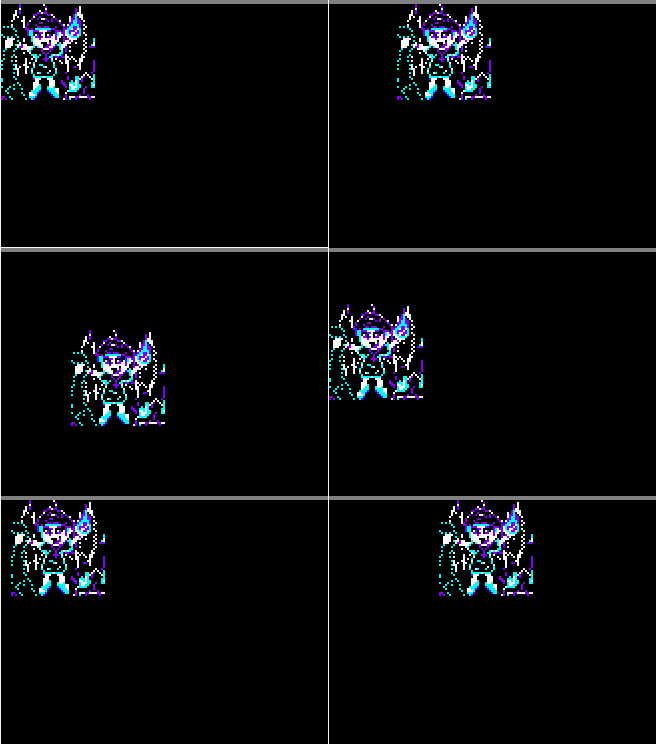
| We're going to draw our mascot onto the screen. We'll move it around the screen, but limit it so it can't go offscreen. |
 |
| Ok, Lets start our program. First we tell our assembler (ArMips) we're compiling for the N64, we are going to save to "\RelN64\cart.N64", and our cartridge needs to start at memory address 0x80000000 |
 |
| We need to define a header for our cartridge. This has things like our program name, country and other useful factoids. It also contains a CRC (calculated Checksum) which needs to be correct, but we'll fix that with 'rn64crc' later. |

|
| We need a 'bootstrap' to start up the n64. We have two options... 1.Code up 1000 lines of code - or 2. patch in a Binary file we 'borrowed' to do the job. We'll use option 2 - actually many commercial games use the exact same bootstrap! |
 |
| We want to pad our cartridge to 8Mb, so we add a 'footer' to do this |  |
| OK! We need to set up our screen! Our screen will be 320x240 - 16 bpp (32,768 colors) it will start from memory address 0xA0100000 The video registers start from address 0xA4400000 - the values shown here will set up the screen. |
 |
GetScreenPos
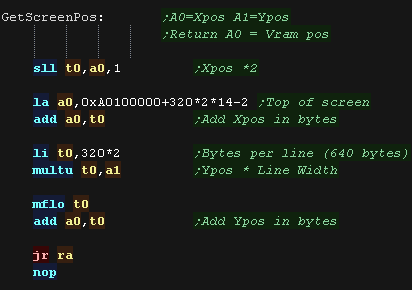
| We want to calculate a screen position! We pass an Xpos in A0 and Ypos in A1 and calculate the final destination in A0 As the first few lines are offscreen, the formula we use to calculate the vram destination is: Vram = 0xA0100000+320*2*14-2 + (320 * 2 * Ypos) + (Xpos * 2) |
 |
DrawBitmap
| We need to create a valid bitmap file to show to the screen. The pixels are in the format %RRRRRGGGGGBBBBBB- On the N64 The data is in BigEndian format. |
 |
| We transfer each line of our source bitmap to the screen. We XOR with the screen data - this means if we draw twice the sprite will be removed We do the bitmap line by line, moving our VRAM destination down one 320 pixel line after each line |
 |
Reading the joystick
| The N64 controllers are connected via the so called 'PIF' chip
(Peripheral Interface?) The base of the PIF registers is at address 0xBFC007C0 To initialize things we first write 0x8 to the status register at 0xBFC007FC |
 |
| We're going to use the serial interface (SI) to send data to
the PIF, This is basically a DMA copy, which sends a block of data. We need to prepare a 96 byte block of data to send to the PIF to initialize things. We also define 8 bytes to get back the results when we do a read! |
 |
| OK we need to use the SI to Send the INIT code to the PIF The SI registers are at 0xA4800000+ We need to calculate our source address (PIF_Init) - but we need the true 'hardware address' we can get this by ANDing with 0x1FFFFFFF We send the source address to 0xA4800000 (SI_DRAM_ADDR_REG) We want to transfer to the PIF ram at 0xBFC007C0 (PIF_RAM_START) - we also AND this with 0x1FFFFFFF We write the destination to the write register at 0xA4800010 (SI_PIF_ADDR_WR64B_REG) - this write also starts the transfer |
 |
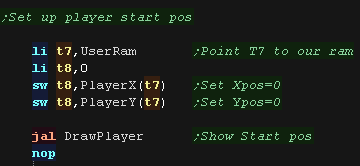
| We define the start XY position for our player. We draw the player to the screen. |
 |
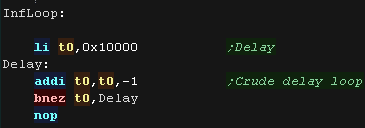
| the N64 is FAST! At the start of the main loop We have a crude delay to slow it down and make our example usable! |
 |
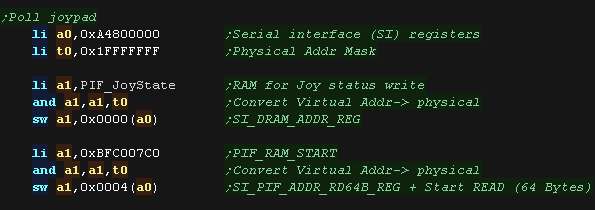
| OK, it's time to read in from the joystick! This time we use the
SI to READ from the PIF. We need to calculate our destination address (PIF_JoyState) - but we need the true 'hardware address' we can get this by ANDing with 0x1FFFFFFF We send the destination address to 0xA4800000 (SI_DRAM_ADDR_REG) - this is the same as the address for writing This time we want to transfer FROM to the PIF ram at 0xBFC007C0 (PIF_RAM_START) - we also AND this with 0x1FFFFFFF We write the source to the read register 0xA4800004 (SI_PIF_ADDR_RD64B_REG) - this write also starts the transfer |
 |
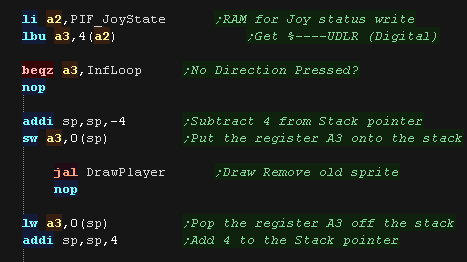
| We wait for a direction to be pressed... When one is, we draw the sprite in the same position again, because it's XORed, this removes the sprite. |
 |
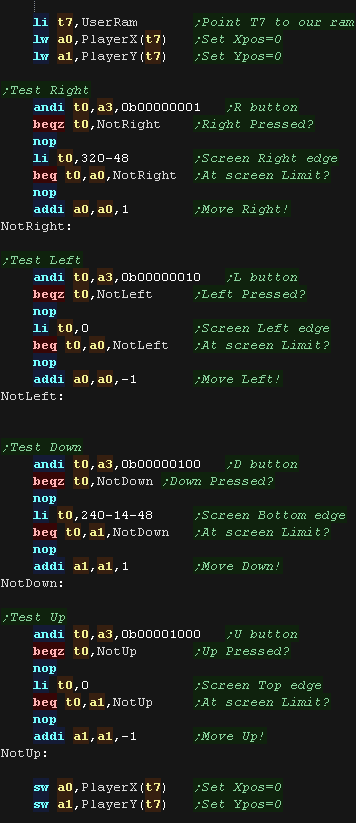
| We now test each direction, Right, Left, Down and Up If a direction is pressed, we check the position of the sprite. If the sprite is at the limit of the axis, we cannot move, otherwise we adjust the position accordingly. |
 |
| We draw in the new location... and repeat! | 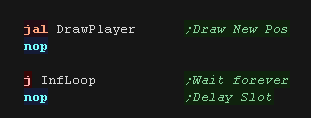 |
 |
This
is a very crude example, and doesn't use any 3D hardware or
anything! It's just a simple example to get something moving onscreen, so you can play with it as you learn mips! |
 |
Lesson
S3 - Bitmap Drawing on the PSX Lets learn how to draw a bitmap onto the screen at a specified location on the Playstation |
 |
 PSX_Bitmap.asm |
 |
Drawing a bitmap
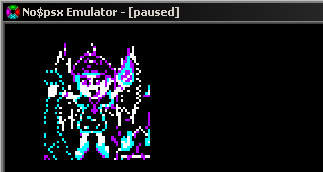
| We're going to draw our 'Chibiko' mascot to the screen Our bitmap is 16bpp in Little Endian in the format %-BBBBBGGGGGRRRRR |
 |
| Ok, Lets start our program. First we tell our assembler (ArMips) we're compiling for the PSX, we are going to save to "\BldPSX\Prog.bin", and our cartridge needs to start at memory address 0x80010000 |
 |
| We need to set up our screen. We use the IO registers from address 0x1F800000+ We set up a 320x240 16bpp screen |
 |
| Our 'Footer' just contains a close command |  |
| Ok, Now for our little program! First we clear the screen - We load the color command into A0 before calling CLS Now we draw our sprite We load A0 with our Xpos,A1 with our Ypos, and the pointer to our bitmap into A2. We call DrawBitmap Then we'll stop - ending with an infinite loop |
 |
Clearing the screen
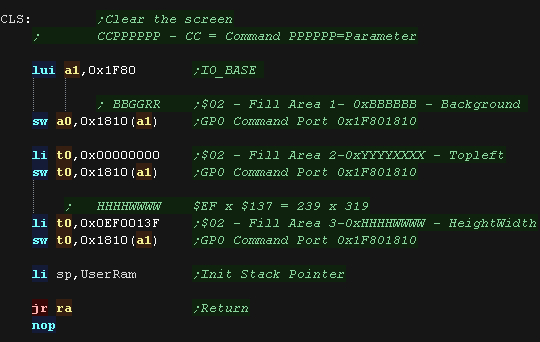
| we need to command the GPU with port 0x1F801810 We use GFX command 0x2 to fill the screen. Our fill color is defined by 8 bits per channel in the format 0xBBGGRR The total screen size is 320*240 pixels, we define the fill area with the following 2 commands The GPU will then clear the screen for us. |
 |
 |
We
can't actually write directly to the PSX screen - We have to use GFX commands. To draw our bitmap, we define a 'window', then stream the pixel bytes into that window |
DrawBitmap
| We need to create a valid bitmap file to show to the screen. The pixels are in the format %RRRRRGGGGGBBBBBB- On the N64 The data is in BigEndian format. |
 |
| To send our bitmap data we first need to set up the GPU with the
parameters of the area we'll draw to. We use command A0 to select the 'Send image' command Next send the X,Y pos. Then we send the Width and Height We also calculate the word count for sending the bitmap data |
 |
| We send all the words of our bitmap to the VRAM via the GP0 port | 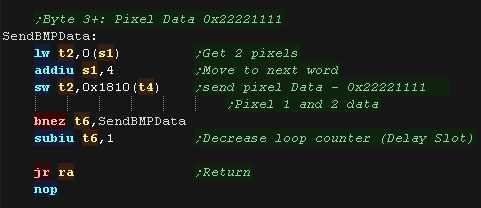 |
| Need to convert your bitmap? No problem! My Akusprite Editor can convert bitmap files to the correct format. Take a look at the MIPS menu -> PSX-> Save Raw Bitmap It will output a binary file in the correct format for this example |
 |
 |
Lesson
S4 - Sprite Movement and Joystick on the Playstation Lets draw a sprite to the screen, and move it with the joypad |
 |
 PSX_Joystick.asm |
 |
Drawing a bitmap
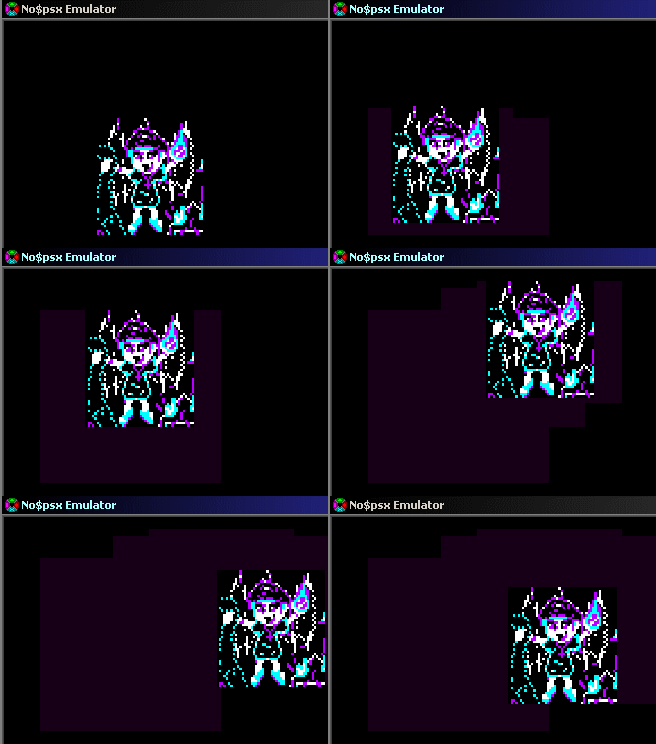
| We're going to draw our mascot onto the screen. We'll move it around the screen, but limit it so it can't go offscreen. |
 |
| Ok, Lets start our program. First we tell our assembler (ArMips) we're compiling for the PSX, we are going to save to "\BldPSX\Prog.bin", and our cartridge needs to start at memory address 0x80010000 |
 |
| We need to set up our screen. We use the IO registers from address 0x1F800000+ We set up a 320x240 16bpp screen |
 |
| Our 'Footer' just contains a close command |  |
| OK! We need to set up our screen! Our screen will be 320x240 - 16 bpp (32,768 colors) it will start from memory address 0xA0100000 The video registers start from address 0xA4400000 - the values shown here will set up the screen. |
 |
Drawing the Bitmap
| We need to create a valid bitmap file to show to the screen. The pixels are in the format %-BBBBBGGGGGRRRRR On the PSX The data is in Little endian format. |
 |
| When we want to draw our bitmap to the screen we load the X and Y pos from Ram |  |
| We need to get the GPU to draw the bitmap data to the screen. We define the 'window' that our bitmap will occupy on the screen. |
 |
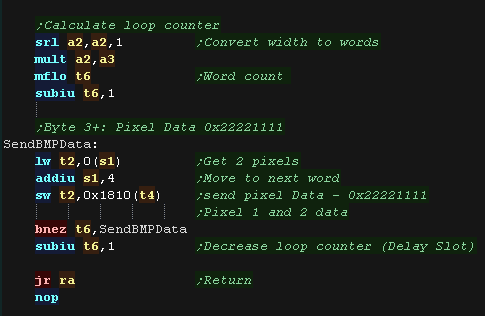
| We send the bitmap data to the GPU one word (two pixels) at a time |
 |
Removing the Bitmap
| We use the Fill Area command to remove our character from the
screen. Strangely it seems the start Xpos is limited to a 16 pixel alignment, so we clear an area 16 pixels wider than our sprite. We shade the removed area dark purple so we can see what was removed. |
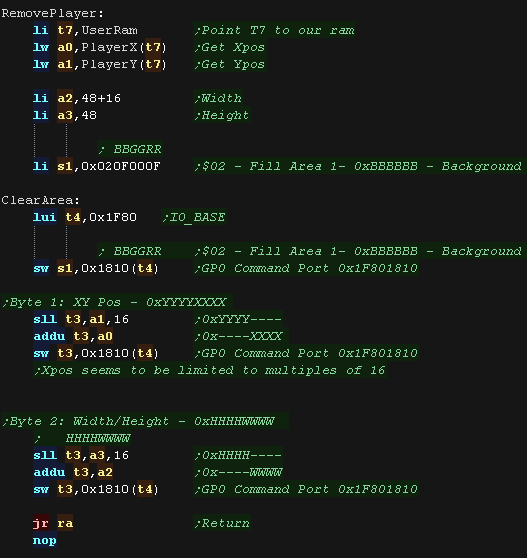 |
| The Fill seems to be
limited to clearing aligned to a 16 pixel boundary. This is probably related to the internal organization of the VRAM in the GPU |
 |
Reading the joystick
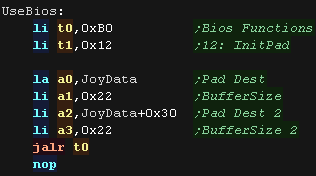
| We're going to execute the bios functions at address 0xB0 (the so
called 'B functions') We need to call this with a function number in T1 - Here we use 0x12 which is 'Init Pad' This takes 4 parameters in A0-A3 A0 is the address of the buffer for joypad 1, A1 is the size (Should be 0x22) A2 is the address of the buffer for joypad 2, A3 is the size (Should be 0x22) |
 |
| Once we have Initialized the joypad we can start the read process. We use Bios function 0x13 'Startpad' - which takes no parameters. This will automatically fill the buffer with the joypad data. |
 |
| We define the start XY position for our player. We draw the player to the screen. |
 |
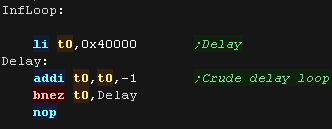
| the PSX is FAST! At the start of the main loop We have a crude delay to slow it down and make our example usable! |
 |
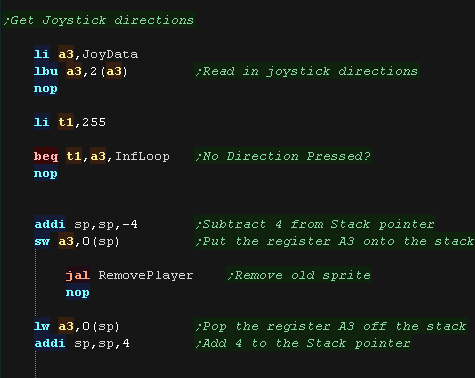
| We wait for a direction to be pressed... When one is, we draw the sprite in the same position again, because it's XORed, this removes the sprite. |
 |
| We now test each direction, Right, Left, Down and Up If a direction is pressed, we check the position of the sprite. If the sprite is at the limit of the axis, we cannot move, otherwise we adjust the position accordingly. |
 |
| We draw in the new location... and repeat! |  |
 |
This
is a very crude example, and doesn't use any 3D hardware or
anything! It's just a simple example to get something moving onscreen, so you can play with it as you learn mips! |